How to Upload a Php File to Shopify
Bulk Product Upload on Shopify using GraphQL Admin API with PHP
In this post we will larn how to upload a listing of products to our Shopify shop by using their GraphQL API. It is a great tool for creating or updating multiple products on the same time if you take thousands of products on your shop. Because with Shopify'due south Rest API, yous tin can only create one production per asking and information technology might takes hours or fifty-fifty days to upload the products. So for the bigger stores that have thousands of products on their Shopify business relationship, GraphQL API is a must to apply tool.
Merely for the first time users of this API, information technology might be a little bit tricky to build the proper logic for uploading process. When I tried to practice this for the get-go time, it took hours for me to understand the certificate of Shopify and then utilize the logic to my lawmaking to upload my products. Only here in this blog I volition show you the code and explain every step of it.
Start thing start, if you lot are hither I suppose that you accept a Shopify store 🙂 and a bunch of production to upload on your store so I will not encompass how to open a shop on Shopify. Now as you have a Shopify store; open your admin dashboard page and go to Apps section.

In the apps section, go to Develop apps and click Create an app button.
Later on y'all create your app you lot volition see your newly creaated app on your Apps list.

But to be able to use our newly created app we must first install it to our store and there are some configurations that we need to exercise for this.
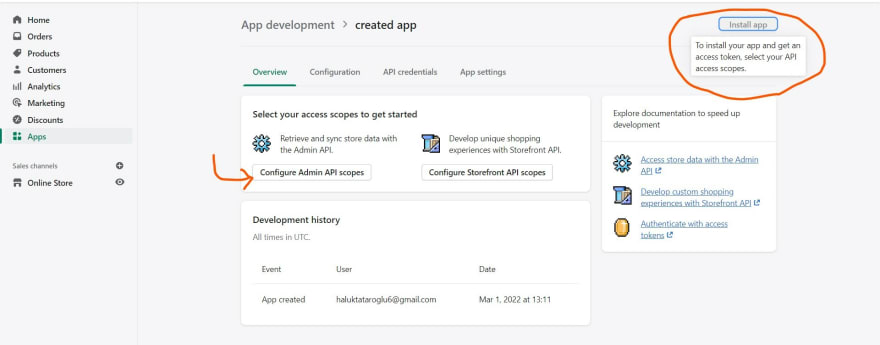
Equally you see we demand to get an access token and select our API access telescopic to install it. For this, get to Configure Admin API scopes.

As our application will be working on the backend side of our store, nosotros will give all the admission to our app. Then we will select all the options from top to lesser;

Later on giving necessary admission to our application, nosotros can now install our app to Shopify store. If you have properly installed the app you volition run across your Admin API access token on your app's API credentials like this;

Once you lot reveal your access token, keep it in a condom place to be able to employ it. Considering Shopify shows this access token only once and subsequently that you should copy and paste it in a secure file of your choice. Also keep your API key and API surreptitious key likewise, equally nosotros will use them in our app.
After these steps now nosotros can jump into our real job 😀
Open up your favorite IDE and create a new PHP file to write our script.
We need to install the dependencies on our app earlier writing any lawmaking. (For this awarding, you need at to the lowest degree PHP 7.3 installed in your development environs. Likewise we use composer as our package managing director.) Now type this on your terminal.
Shopify PHP library installation:
composer require shopify/shopify-api After installing Shoppify API library we tin utilize information technology on our app similar this:
use ShopifyClientsGraphql; But to exist able to use the classes from our composer libraries we need to do the autoloading with this code:
crave __DIR__ . '/vendor/autoload.php'; Afterwards that, when we look at the documentation, it says every time you want to utilise your app, yous should first set your configurations. Yous can do that by calling the ShopifyContext::initialize method. Here is the case usage of the class that nosotros tin can find in the documentation of Shopify.
use ShopifyContext; use ShopifyAuthFileSessionStorage; Context::initialize( $_ENV['SHOPIFY_API_KEY'], $_ENV['SHOPIFY_API_SECRET'], $_ENV['SHOPIFY_APP_SCOPES'], $_ENV['SHOPIFY_APP_HOST_NAME'], new FileSessionStorage('/tmp/php_sessions'), '2021-10', true, simulated, ); (To not having an error on this stage you lot might need to manually create the tmp folder inside of your vendor/shopify/shopifyApi/src/Auth directory.)
As you see at present we are using our API credentials at this bespeak. Since we don't desire to utilize our API credentials directly on our script we will create an .env file on the main directory of our app. Nosotros will use a library called PHP dotenv for the easier usage of our environs variables. On your terminal, type this to install the library.
$ composer require vlucas/phpdotenv Your .env file should looks like this:
SHOPIFY_ADMIN_API_ACCESS_TOKEN = "YOUR Access TOKEN HERE" SHOPIFY_API_KEY = "YOUR API Key Hither" SHOPIFY_API_SECRET = "YOUR API Clandestine HERE" SHOPIFY_APP_HOST_NAME = "https://YOURSHOPNAME.myshopify.com/admin/api/2022-01/products.json" SHOPIFY_APP_SCOPES = "read_analytics, write_assigned_fulfillment_orders, read_assigned_fulfillment_orders, write_customers, read_customers, write_discounts, read_discounts, write_draft_orders, read_draft_orders, write_files, read_files, write_fulfillments, read_fulfillments, read_gdpr_data_request, write_gift_cards, read_gift_cards, write_inventory, read_inventory, write_legal_policies, read_legal_policies, read_locations, write_marketing_events, read_marketing_events, write_merchant_managed_fulfillment_orders, read_merchant_managed_fulfillment_orders, read_online_store_navigation, write_online_store_pages, read_online_store_pages, write_order_edits, read_order_edits, write_orders, read_orders, write_payment_terms, read_payment_terms, write_price_rules, read_price_rules, write_product_listings, read_product_listings, write_products, read_products, write_reports, read_reports, write_resource_feedbacks, read_resource_feedbacks, write_script_tags, read_script_tags, write_shipping, read_shipping, write_locales, read_locales, read_shopify_payments_accounts, read_shopify_payments_bank_accounts, read_shopify_payments_disputes, read_shopify_payments_payouts, write_content, read_content, write_themes, read_themes, write_third_party_fulfillment_orders, read_third_party_fulfillment_orders, write_translations, read_translations" And past the help of dotenv library nosotros can merely type
if we demand our API central.
By the way we took that SHOPIFY_APP_SCOPES array from this folio of our Shopify admin dashboard:

Until now our lawmaking should looks like this:
<?php require __DIR__ . '/vendor/autoload.php'; use ShopifyClientsGraphql; use ShopifyContext; use ShopifyAuthFileSessionStorage; utilise ShopifyClientsGraphql; $dotenv = DotenvDotenv::createImmutable(__DIR__); $dotenv->safeLoad(); Context::initialize( $_ENV['SHOPIFY_API_KEY'], $_ENV['SHOPIFY_API_SECRET'], $_ENV['SHOPIFY_APP_SCOPES'], $_ENV['SHOPIFY_APP_HOST_NAME'], new FileSessionStorage('<...>/vendor/shopify/shopify-api/src/Auth/tmp/shopify_api_sessions'), '2021-10', true, false, ); I thing you should exist careful almost until now is:
new FileSessionStorage('<...>/vendor/shopify/shopify-api/src/Auth/tmp/shopify_api_sessions'), at this part y'all should enter the exact path of your tmp/sessions file.
After these commencement steps nosotros will at present start the bulk importing steps. This is the diagram that shows how the majority importing works.

So first of all we will create a JSONL file and add together our GraphQL variables to information technology. In the JSONL file, each line represents 1 product input. The GraphQL Admin API runs once on each line of the input file. 1 input should take upward one line simply, no matter how complex the input object construction is.
Hither is the instance JSONL file construction that we use in this project.
{"input":{"title":"Inventore excepturi ut.","productType":"provident","vendor":"Johns Group"}} {"input":{"title":"Quod aspernatur.","productType":"corporis","vendor":"Vandervort-Rohan"}} {"input":{"championship":"Doloremque id.","productType":"ut","vendor":"Graham and Sons"}} {"input":{"title":"Pariatur et velit.","productType":"dolores","vendor":"Koelpin, Hane and Steuber"}} {"input":{"championship":"Nisi laudantium.","productType":"voluptatem","vendor":"Keeling-Daniel"}} {"input":{"title":"Exercitationem perferendis deleniti.","productType":"et","vendor":"Goldner, Nolan and Mertz"}} {"input":{"title":"Cum architecto.","productType":"ipsa","vendor":"White Ltd"}} {"input":{"title":"Mollitia at quo.","productType":"corporis","vendor":"Altenwerth Inc"}} {"input":{"title":"Molestiae illum nihil.","productType":"dolorum","vendor":"Terry-Koch"}} {"input":{"championship":"Molestias dicta.","productType":"praesentium","vendor":"Swaniawski, Haley and Dooley"}} You see we have 10 lines of input each representing one of the products. According to your production, input you can arrange your JSONL file.
Secondly, we need to upload our JSONL file to the Shopify. For that we need to offset generate the upload URL and parameters.
We volition apply the stagedUploadsCreate mutation to generate the values that y'all demand to authenticate the upload. The mutation returns an array of stagedMediaUploadTarget instances.
Also this will be a POST query to Shopify API. To be able to make a query to Shopify API we need a new graphQL case too. And we need our access token that we kept in .env before. Here is the code for creating our instance:
$accessToken = $_ENV['SHOPIFY_ADMIN_API_ACCESS_TOKEN']; $customer = new Graphql("<YOUR-SHOP-NAME-HERE>.myshopify.com", $accessToken); And equally I like to put my queries in a variable, my query would looks like this:
$staged_upload_query = ' mutation { stagedUploadsCreate(input:{ resource: BULK_MUTATION_VARIABLES, filename: "bulk_op_vars", mimeType: "text/jsonl", httpMethod: POST }){ userErrors{ field, bulletin }, stagedTargets{ url, resourceUrl, parameters { name, value } } } }'; This mutation will generate the values required to upload a JSONL file and be consumed past the bulkOperationRunMutation. So, I will take the response of that query and put information technology in a JSON file for meet the results easily. Then nosotros will use that variables in the next phase. Hither is how I saved my response:
$response = $customer->query(['query' => $staged_upload_que]); $graphql_variables = $response->getBody()->getContents(); file_put_contents('graphql_variebles.json', $graphql_variables); The response should look like this:
{ "data": { "stagedUploadsCreate": { "userErrors": [], "stagedTargets": [ { "url": "https://shopify.s3.amazonaws.com", "resourceUrl": zilch, "parameters": [ { "name": "key", "value": "tmp/61275799751/bulk/893d0275-8da9-4308-b0b8-133338f97812/products.jsonl" }, { "name": "Content-Blazon", "value": "text/jsonl" }, { "name": "success_action_status", "value": "201" }, { "name": "acl", "value": "individual" }, { "name": "policy", "value": "eyJleHBpcmF0aW9uIjoiMjAyMi0wMi0yNFQwOToyMjo0NVoiLCJjb25kaXRpb25zIjpbeyJidWNrZXQiOiJzaG9waWZ5In0sWyJjb250ZW50LWxlbmd0aC1yYW5nZSIsMSwyMDk3MTUyMF0seyJrZXkiOiJ0bXAvNjEyNzU3OTk3NTEvYnVsay84OTNkMDI3NS04ZGE5LTQzMDgtYjBiOC0xMzMzMzhmOTc4MTIvcHJvZHVjdHMuanNvbmwifSx7IkNvbnRlbnQtVHlwZSI6InRleHQvanNvbmwifSx7InN1Y2Nlc3NfYWN0aW9uX3N0YXR1cyI6IjIwMSJ9LHsiYWNsIjoicHJpdmF0ZSJ9LHsieC1hbXotY3JlZGVudGlhbCI6IkFLSUFKWU01NTVLVllFV0dKREtRLzIwMjIwMjI0L3VzLWVhc3QtMS9zMy9hd3M0X3JlcXVlc3QifSx7IngtYW16LWFsZ29yaXRobSI6IkFXUzQtSE1BQy1TSEEyNTYifSx7IngtYW16LWRhdGUiOiIyMDIyMDIyNFQwODIyNDVaIn1dfQ==" }, { "proper noun": "x-amz-credential", "value": "AKIAJYM555KVYEWGJDKQ/20220224/us-east-1/s3/aws4_request" }, { "name": "x-amz-algorithm", "value": "AWS4-HMAC-SHA256" }, { "name": "x-amz-date", "value": "20220224T082245Z" }, { "proper noun": "10-amz-signature", "value": "b48e6dc6a00d867d418151672670bbfac6b178953c45b4775518b9951d1fc52d" } ] } ] } }, "extensions": { "cost": { "requestedQueryCost": xi, "actualQueryCost": 11, "throttleStatus": { "maximumAvailable": 1000.0, "currentlyAvailable": 989, "restoreRate": 50.0 } } } } Now after having these variables, we volition transport a Postal service request to API with them and at the and of our asking we attach our JSONL file that we prepared earlier. According to the documentation, the request should look similar this:
curlicue --location --asking POST 'https://shopify.s3.amazonaws.com' --form 'key="tmp/21759409/bulk/89e620e1-0252-43b0-8f3b-3b7075ba4a23/bulk_op_vars"' --class 'x-amz-credential="AKIAJYM555KVYEWGJDKQ/20210128/the states-due east-1/s3/aws4_request"' --form 'ten-amz-algorithm="AWS4-HMAC-SHA256"' --grade 'x-amz-date="20210128T190546Z"' --form '10-amz-signature="5d063aac44a108f2e38b8294ca0e82858e6f44baf835eb81c17d37b9338b5153"' --form 'policy="eyJleHBpcmF0aW9uIjoiMjAyMS0wMS0yOFQyMDowNTo0NloiLCJjb25kaXRpb25zIjpbeyJidWNrZXQiOiJzaG9waWZ5In0sWyJjb250ZW50LWxlbmd0aC1yYW5nZSIsMSwyMDk3MTUyMF0seyJrZXkiOiJ0bXAvMjE3NTk0MDkvYnVsay84OWU2MjBlMS0wMjUyLTQzYjAtOGYzYi0zYjcwNzViYTRhMjMvYnVsa19vcF92YXJzIn0seyJDb250ZW50LVR5cGUiOiJ0ZXh0L2pzb25sIn0seyJzdWNjZXNzX2FjdGlvbl9zdGF0dXMiOiIyMDEifSx7ImFjbCI6InByaXZhdGUifSx7IngtYW16LWNyZWRlbnRpYWwiOiJBS0lBSllNNTU1S1ZZRVdHSkRLUS8yMDIxMDEyOC91cy1lYXN0LTEvczMvYXdzNF9yZXF1ZXN0In0seyJ4LWFtei1hbGdvcml0aG0iOiJBV1M0LUhNQUMtU0hBMjU2In0seyJ4LWFtei1kYXRlIjoiMjAyMTAxMjhUMTkwNTQ2WiJ9XX0="' --grade 'acl="individual"' --grade 'Content-Type="text/jsonl"' --form 'success_action_status="201"' --course '[e-mail protected]"/Users/username/Documents/bulk_mutation_tests/products_long.jsonl"' But every bit nosotros are using PHP, I inverse this CURL request to proper PHP code. So after converting it, hither is my code for this Postal service request:
$ch = curl_init(); curl_setopt($ch, CURLOPT_URL, $curl_opt_url); curl_setopt($ch, CURLOPT_RETURNTRANSFER, i); curl_setopt($ch, CURLOPT_POST, ane); $post = assortment( 'key' => $curl_key, 'x-amz-credential' => $curl_x_amz_credentials, 'ten-amz-algorithm' => $curl_x_amz_algorithm, 'x-amz-engagement' => $curl_x_amz_date, 'ten-amz-signature' => $curl_x_amz_signature, 'policy' => $curl_policy, 'acl' => 'private', 'Content-Type' => 'text/jsonl', 'success_action_status' => '201', 'file' => new CURLFile('C:UsersFatihDesktophalukrugsproducts.jsonl') ); curl_setopt($ch, CURLOPT_POSTFIELDS, $post); $upshot = curl_exec($ch); if (curl_errno($ch)) { echo 'Mistake:' . curl_error($ch); } curl_close($ch); At this part you will only change the verbal path of your products.jsonl file.
And I will become the variables from the graphQLvariables.JSON file that we simply created in the previous step. Here is how I get them:
$curl_opt_url = json_decode($graphql_variables)->information->stagedUploadsCreate->stagedTargets[0]->url; $curl_key = json_decode($graphql_variables)->data->stagedUploadsCreate->stagedTargets[0]->parameters[0]->value; $curl_policy = json_decode($graphql_variables)->information->stagedUploadsCreate->stagedTargets[0]->parameters[four]->value; $curl_x_amz_credentials = json_decode($graphql_variables)->data->stagedUploadsCreate->stagedTargets[0]->parameters[five]->value; $curl_x_amz_algorithm = json_decode($graphql_variables)->information->stagedUploadsCreate->stagedTargets[0]->parameters[6]->value; $curl_x_amz_date = json_decode($graphql_variables)->data->stagedUploadsCreate->stagedTargets[0]->parameters[7]->value; $curl_x_amz_signature = json_decode($graphql_variables)->data->stagedUploadsCreate->stagedTargets[0]->parameters[8]->value; But of course yous should put these variables before your curlicue request.
This request will return an xml file and we need the Key of that effect. I handled this by converting the result into an array and so take the KEY equally a cord which I will use in the next step as stagedUploadPath parameter.
$arr_result = simplexml_load_string( $result, ); Now nosotros can step into most disquisitional role of our program. Nosotros volition start creating our products in a majority operation. We will use productCreate method inside of our bulkOperationRunMutation method. And we will pass it to the latter one equally a string. And simply equally earlier I volition put this query into a variable. Here is my query looks like:
$product_create_query = 'mutation { bulkOperationRunMutation( mutation: "mutation call($input: ProductInput!) { productCreate(input: $input) { product {championship productType vendor} userErrors { message field } } }", stagedUploadPath: "' . (cord)$arr_result->Key . '") { bulkOperation { id url status } userErrors { message field } } }'; As you see this is actually two mutation but the productCreate is running inside the bulkOperationRunMutation process. Besides be careful that we utilise the Central from the previous step as stagedUploadPath parameter.
And for the results of this query, you tin use this code:
$product_create_response = $client->query(["query" => $product_create_query]); Now if this operation would work well, you should have a response like this:
{ "information": { "bulkOperationRunMutation": { "bulkOperation": { "id": "gid://shopify/BulkOperation/206005076024", "url": zero, "status": "CREATED" }, "userErrors": [] } }, "extensions": { "cost": { "requestedQueryCost": 10, "actualQueryCost": 10 } } } If you see this result, that means you have successfully created your products in your Shopify store, Congratulations!!! 😀 🙂 Yous tin can check it in your products folio of your Dashboard.
Only there is nevertheless some piece of work that you might want to do. If you lot are using graphQL API, y'all must have thousands of products to upload Shopify. That means this procedure might still have some time to end. And at this fourth dimension you might desire to check the status of your bulk operation whether information technology is completed or however running. Don't worry, it is an easy chore.
To be able to check the status of our bulk operation, nosotros need the id of that operation:
$bulk_op_id = json_decode($product_create_response->getBody()->getContents())->data->bulkOperationRunMutation->bulkOperation->id; And we have another mutation for checking the functioning status; currentBulkOperation.
I use that query inside a role and then that I can telephone call information technology in a timer. Hither is my part for checking the status of bulk op. :
function check_bulk_op_status($client) { $op_finish_que = 'query { currentBulkOperation(blazon: MUTATION) { id status errorCode createdAt completedAt objectCount fileSize url partialDataUrl } }'; $op_finish_resp = $customer->query(["query" => $op_finish_que]); $str_op_finish_resp = $op_finish_resp->getBody()->getContents(); $status_op_finish_resp = json_decode($str_op_finish_resp)->data->currentBulkOperation->status; render $status_op_finish_resp; } And past using that part, I check the status of my operation every 3 seconds (you lot tin do longer in a real life scenario since it will take some time to finish the process and in that location is no need to check the status every3 seconds) with these line of codes:
$bulk_op_status = check_bulk_op_status($customer); while ($bulk_op_status != 'COMPLETED') { $bulk_op_status = check_bulk_op_status($client); var_dump('majority performance status: ' . $bulk_op_status); sleep(three); } This was the last step of bulk product uploading process. When you see "Completed" on your concluding, then your functioning is done.
Here is the consummate code of this plan:
Bulk PRoduct Upload
And yous tin find the documentation on here:
Majority import
GraphQL API
Shopify API
Lastly, I merely comprehend the basics of product uploading for the first time users of Shopify Admin GraphQL API. I tin't say I used all the best practices on my code but this was merely a basic case of how nosotros can utilize the GraphQL API of Shopify. Once yous get the basics you can do more than complex production upload tools past yourself. Hope this was a helpful article for those who are struggling to understand the Shopify'due south documentation. Come across you on the adjacent articles.
Source: DEV Community
March 2, 2022Tags:
Source: https://lzomedia.com/blog/bulk-product-upload-on-shopify-using-graphql-admin-api-with-php/
0 Response to "How to Upload a Php File to Shopify"
Post a Comment